
Moving on to the next part of our sew-along – the Dreaded Double-Welt Pockets
 \
\
AHHHHHHHHHHH!!!
I will admit, this part gave me some serious hair-pulling when I first attempted it because the instructions run on the sparse side. Don’t worry, though – I took LOTS of pictures and even ran a few through my beloved Microsoft Paint, so hopefully y’alls first attempts will be a much smoother process 🙂 The procedure itself it fairly simple, it’s just very precise. If the idea of welts is still terrifying – make a test welt pocket on some of your leftover scraps! No shame!!

Today we will be sewing steps 4-6.
Before you do ANYTHING with these pieces, take a moment to ensure that you have transferred all your pattern markings and notches to the fabric pieces. Like I said, welts are very precise, so the markings for this step are pretty critical. With that being said, the slash lines for the welt pocket should be transferred to the right side of your pieces; everything else should go on the wrong side.
If you have not already done so, go ahead and sew up your back darts and press them toward the center back (or, as Tasia writes: “centre.” Ehhheheehehe how cute, I wish I was Canadian sometimes lol)

Take your back pocket facing (piece 13) and finish the long edges with your preferred method of seam finishing.

Place the facing on the back pocket lining (14), both with right sides up, matching the notches. It took me a bit of head-scratching to figure this part out – see how the notches aren’t exactly centered on the sides of the facing, but rather creep up in one direction? The notches should be closest to the top of the lining (the end with the single notch). It’s hard to explain this without the ability to flail my arms around, so hopefully this picture makes a bit of sense!
You are going to edgestitch this piece down, in the same manner that you edgestitched the front pocket facings. Again, this piece’s job is to act as a little curtain for your welt pocket windows.

Speaking of welts… take your interfaced welt pieces and fold them in half, wrong sides together. Press and baste the long edges closed.
IT IS TIME.

The welts start out on the right side of your back trouser pieces (so yeah, I sure hope you transferred that marking to the right side!). The welt gets placed along the pocket line, with the raw (ie, non-folded) edge just exactly butting up against it.

Here it is with both welts pinned down. I highlighted my pocket line in pink so you can see exactly where it is.

There should be a notch at either end of both welt pieces. These indicate where you will start and stop stitching.
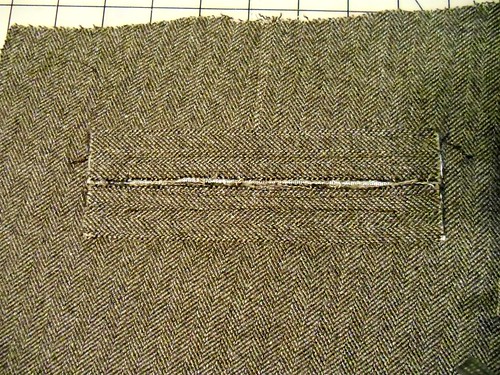
Stitch down the center(e) of each welt, starting at one notch and ending at the second. Don’t forget to backstitch!

Grab your pocket lining, and place it face down, upside-down over the bottom welt, matching the raw edges. Sew the lining to the welt only, being careful not to catch the pants back in your stitches.
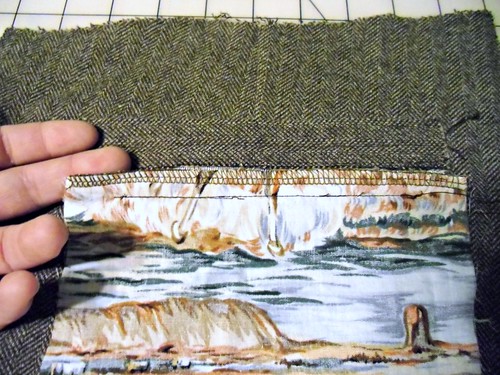
Finish the raw edge.

Ok, time to cut into those pants and set the welts free! Cut straight down your slash line (disregard that it looks like someone chewed on mine!), stopping about 1/4″ from the end of your stitching lines. From the end of your cutting line (the marked X) to the end of your stitching line (circled), you want to cut at an angle, connecting the two.
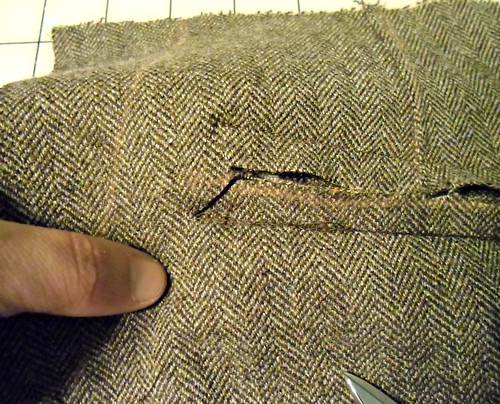
Here is a better picture. Be careful not to cut too far, but don’t be timid and not cut deep enough – you want to end exactly at the stitching line. This would be a good time to practice on those scraps 🙂
Do this to both welt pockets, top and bottom, on either end.

Grab your pocket lining and pull it through the hole until it’s on the wrong side of your pants back.

I like to give my welts a quick press at this point, just to make sure I’ve clipped far enough and that everything is looking good so far.
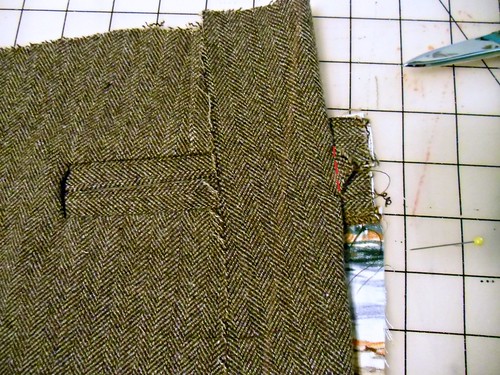
Flip the pants back over, right side facing up. Fold over one side to expose the end of the welts. See the little triangle there? We are going to stitch that down to the welts, exactly on the indicated stitching line.

When sewing the triangle down, a few things to keep in mind: keep the welts butted together. You can hand-baste the welts closed if you are having trouble with this. Also, you want to get as close to the edge as possible, without actually catching non-triangle fabric. Use a zipper foot, and hand-baste the triangle in place before you start sewing, to ensure that it won’t move when you’re at the machine.


Now take that bad boy over to the iron & give ‘er a good press!!
See? Hard part over! Now to turn those welts into pockets and not ass-windows.

Pull the top (aka, notched end) of the lining toward the top of your pants back, folding at the fold line. All the right sides should be encased in the pocket and you should be looking at the wrong side of the fabric.

See the top welt stitching line? We are going to sew right on top of the welt only, to make sure that our pocket doesn’t have secret back fat pocket space.

Be sure to catch only the welt & the lining. Again – the pants back isn’t invited to this party! SORRY.

Now sew up the sides of your pocket, and finish the edges.

Then baste the top of the pocket lining to the pants back.
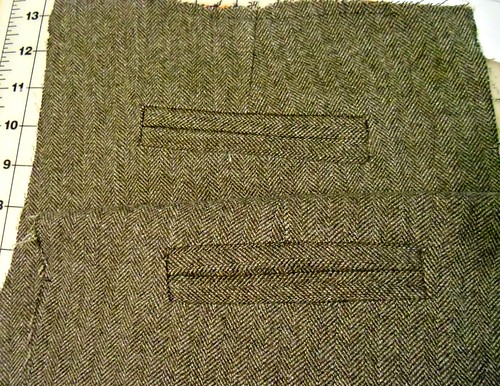
Ta da! Beautiful, functional, double-welt pockets!
Now that wasn’t so hard, was it? 🙂
If you’re caught up to speed, go ahead & complete steps 7 & 8. Next week: the fly & all it’s fly-glory, woohoo.


Me gusta mucho tu explicación. Yo también estoy poniendo esos bolsillos a unos pantalones ahora!!! es divertido!!!
You make it look so easy! Let’s see if I can get it to work out as well this weekend :S
i confess to being one of those people who really like making welt pockets of any type! though, no matter how many times i’ve done them, it always takes me about three times as long as i think it’s going to. great job of breaking it down!
Really well explained! It went like a charm, and for a first try, they look pretty awesome !! Thanks Lauren!!
Aw yeah, this makes me happy! Glad I could help 🙂
ass windows 🙂 haha! Love it
Thank you for posting the next stage – I was too excited to wait and tried it myself only to find that it’s gone slightly wrong, but maybe it’s not wrong at all. I feel like my dart has put a slight curve to the pocket line… is this OK or should i redraw it completely straight again?? I am thinking of recutting that back panel and redoing it.
(PS: you might want to correct the wording above to say that the welts should be folded WRONG sides together and then basted) Love your tutorial and all the photos. It makes it so much easier to follow! Thank you! 🙂
.
My dart gave my pocket a slight curve too. I left it as-is on all my Thurlows, I think it’ll be ok! And, ah, thank you for spotting that!! I will correct it as soon as I can get to a computer 🙂
Yay, it actually worked and I’m chuffed! I still need to perfect the corners so they don’t “dimple” or whatever it’s called but I know i’m going to make more of these pants so I’ll practice and practice until I get it right! 🙂
So awesome! I’m glad my tutorial is helping people 🙂
For the pocket dimples – try cutting closer into the corner (but not too far, obviously – just a couple of threads!). The dimple usually indicates that you haven’t cut far enough. A really aggressive steam session with your iron should help too 🙂
I’m not participating in the sew along right now but this is a great resource! I’ve made a few welt pockets and it seems like every sewer had his or her own little variations.
Love your fabric!
My first (ever) practice welt was, well, er, just OK. The second, on my Thurlows, went much better, and the third, well, I’m pretty ecstatic over it and did it in half the time of the second one! (And side-by-side, no one can tell the difference but me). Practice definitely makes better. And I seriously spit out my coffee while reading about the potential ass-windows! Love your blog and thank you so much for taking the time to share your knowledge. I’m a visual learner, and your photos are definitely the reason my Thurlows are going to be awesome! I know this will be the first pair of many.
oh. my. stars. these are gorgeous pockets! I got my pattern today! bahahahaha ass windows! (i probably shouldn’t laugh, I might end up with them…)
Yay! I did it! THANKYOU! Your directions were so much better than the patterns! Thank God I found you!
Thank you for this, the pictures were very helpful. I’ve made the Thurlow trousers at least 6 times before, but I’ve always left off the welt pockets because I was too scared to try them, but today I finally tackled them with your help!
So, I introduced a friend to Thurlow, then when she got all excited about them I showed her your sewalong. She just posted photos of her gorgeous welts on Facebook and said, I quote, “without Lladybird I’d be sobbing in a corner.” Thought you’d appreciate that 🙂
I do appreciate it!! So glad she found my sew-along helpful, yay! 🙂
Made welts for the very first time today, using your guide. You have explained everything great but i still had problems getting the welts not to overlap. It took a few rounds of pulling out stitches (and cursing). Any secrets to making that step a breeze?? “Stitch down the middle” seems too easy…
Thanks! Love your blog and your stuff! x
This is super helpful, thank you! I only made pj pants before and I’m doing a muslin for thurlow trousers right now. I feel like an idiot for asking but I’m not sure about steps 7&8. 7 says to attach the front and back along on the inseam but it does not say anything about left and right sides being apart. Do I just attach left back left front on the inseam ad repeat for the right side? Or do I try to attach everything all together ? Any reply will be appreciated, thank you !
Are you asking about the side seams? Those aren’t sewn together yet – you’ll attach the inseams and the side seams will come together later 🙂 Check ahead a few steps in the instructions and you’ll see it – that’s what I do if something confuses me, ha. Hope this helps! If it doesn’t, holler at me and I’ll see what i can do for ya 🙂
You are so sweet to reply. I understand the side seams are done later. I attached left front piece to the left back piece on the inseam. Did the same on the right side so I have two big pieces but I’m not sure how to attach the front crotch to do all the front fly stuff you so beautifully explain. Does this make sense?
Ok, yes, sorry, I just needed to go find my instructions! So you’ve attached the left front to the left back, and also the rights. The next thing you’ll do is attach both big pieces together at the curved center seam between notches – which is step 8. From there, you should have a left front and a right front that are partially attached, where you can insert the fly.
I hope this answers your question! I can be a total doofus sometimes 🙂
Oooo. Starting to make sense. I can’t wait to get home to work on this now! Thank you X 1000.
Hi Lauren, thanks SO much for this, I am trying my first pair of Thurlows and as you say the instructions on this bit = very light on. I would NEVER have worked out this step without your explanation! One question though. When you first sew the pocket lining to the bottom welt, it says in the pattern to follow the first stitching line. I find this impossible as you can no longer see the stitching line after putting the lining on top of the welt. I ended up with a visible line of stitching from the RS on the bottom welt. Any tips on avoiding this? Ta!
If you flip the pants over so the welt is on top of the lining, you can see the first stitching line 🙂 You don’t have to sew precisely on it – it’s just a guideline. But it sounds like you are stitching through all layers, including the pants themselves, which is why you’re getting visible stitching from the right side. If you pull the pants out of the way and sew *just* through the lining and welt, it won’t be visible from the right side. Hope that makes sense!
Thanks for that. I wasn’t sewing thru the pants, but I realised that I was sewing on the wrong side of the seam (dopey), so the second try was all good! Ta for your excellent work.
Basting the top of the pocket to the top of the pans is brilliant. The load (in an engineering sense) of the pocket will be transferred to the waistband and thereby reduce the gaping of the welts. Brava!
I’ve never thought about the pockets from an engineering standpoint, but that makes perfect sense. Actually, you just blew my mind a little. Tasia is BRILLIANT!
Nicely done, and SO appreciated!! I have one lame question though…I know the instructions say to use a 5/8″ seam allowance, unless otherwise told something else. For some reason it just feels wrong to do that here, but it could be my problem. Did you use a 5/8″ allowance to sew down the center of the welts?
I know what you mean, it totally does feel wrong 🙂 But you will indeed use a 5/8″ seam allowance, even down the center of the welts. If you use too small of a seam allowance, you will end up with welts that are too big for the pocket opening. Hope that makes sense 🙂
Ignore me…I need to just trust instructions sometimes and 5/8″ did the trick. That and some practice and you’re right, it’s not so hard. I should have also trusted your advice to practice on scraps though! It turned out fine, but would have been better had I listened. LOVE your sassy blog 🙂
Thank you! The blog loves you right back 😀 haha
I know this post is years old, but I just did the double welt pockets on my first pair of Thurlow shorts. Your tutorial helped so much, and they turned out perfectly! I definitely would have sewn something upside down, inside out, or had double stitching lines on the back of the shorts if it wasn’t for your instructions. Thanks again from another southern Lauren.
I’m so glad it helped you! Old post or not, I always like hearing that my tutorials are useful 🙂 You are SO welcome! 🙂 ♥
I love this tutorial, I have it bookmarked and refer to it every time I make welt pockets! Thank you for taking the time to explain so thoroughly:)
I’m so glad you like it 🙂 Yay!
Oh my gosh thank you so much for this! (for the entire Thurlow sew along really) I just decided to join the Thurlow party and was trying to make sense of their directions. I’m glad I remembered this from perusing your site before. 🙂
i’ve had the thurlow pattern since i saw this sewalong in 2012, and now its 2020 and its covid quarantine and i’m finally making them!!!!! thank you for this sew along! and especially for this welt pocket hand holding experience. u r my #1 patron saint of sewing!
Ha ha I have also had this pattern for so many years!! I made the pants and pockets and almost got to the waistband stage…they are still in my drawer…perhaps with this inspiration I may pull them out again!! 😂